Sunday, December 19, 2010

Fairy Tales and Tiles


I really love experimenting with canvas now. It's relaxing and fun and no limit to what you can do, just let your imagination run free!

This first canvas I made for a WTA for the group "Once Upon a Time..." on swap-bot. The theme was "Hansel and Gretel" so I made a representation of the witch's cottage in the woods with a little bread crumb trail. Some fairy tales are true...is this one? Every folk tale or fairy tales has some roots in local legends or truth, so I wanted to bring that out and let the mind wonder which part of this tale may have been true.

The second one is something new for me. Using layers of acrylics and crackle paints, stamps and washes I created the back ground for this piece. Then I used vintage book pages and acrylic tiles with images from some of my favorite papers applied to them to create the finished look.

These were fun and I want to make more. We'll see what I can come up with in the next few weeks as I play and discover new ideas! Until then, happy holidays everyone!

Thursday, December 16, 2010

Dusk in Paris...


This is my second canvas to date. I love this shade of purple, purple is one of my favorite colours and I love using varying shades of it in my art when I am able.

This time I used Distress Inks in "Broken China" and "Dusty Concord" for the background and edges, respectively. I then used the Perfect Pearls Mist in "Forever Violet" and Glimmer Mist in "Iridescent Gold" to set and also add some shimmer and glam to the piece. The stamps are by Tim Holtz and inked with StazOn in black. I then used pieces of handmade Lokta paper and added strips here and there that I then coated with Distress crackle paint in "Rock Candy for a slight sheen and to make them stand out just a little more. I then embellished with a small image of the Eiffel Tower and paper roses and ribbon.

I am enjoying creating little pieces of art like these, it's new for me and I am very excited at all the new possibilities! Happy crafting and have a lovely day!

Dancing in Paris...


This is my first canvas piece. I made it for my niece for a Christmas gift this year, as she loves anything Paris. I started with canvas I purchased at Hobby Lobby, and used various Walnut stains that I sprayed onto the canvas. I immediately used my Heat-It tool to dry, then I layered Liquitex acrylic paint in "Portrait Rose" over that. I then used a hand-carved stamp that I received from bluemonkeymama of the Eiffle Tower and stamped it with StazOn in black.

Then I added the image of the dancer, lightly sprayed with Glimmer Mist in "Pearl" with tacky glue and lightly heated to make the edges slightly curl. I sealed the entire surface with Distress crackle paint in "Rock Candy" and heated it to dry. After that I lightly sprayed the smaller squares with Perfect Pearl Mist in "Forever Violet" and attached them with tacky glue as well. I then added a brad and some ribbon for the final embellishments.

I really hope she likes this and that "Dancing in Paris" will make the holidays a bit brighter. Have a lovely season everyone!

"Faerie Post" is here!


Hello everyone! I am back after a long bout of not feeling my best. We are expecting in June and this first trimester really took everything I had including creative energy. But I am starting to feel better and so here start the crafts once again.

This is an ATC to a friend of mine in my swap-bot group Keepers of Avalon. She won the "Winner-take-all" (WTA) this October and here is what I made for her. It is backed on illustration board. The background is Distress Ink in "Dusty Concord" then sprayed with Glimmer Mist in "Pearl." Since Distress Ink is a water soluble ink, the mist reacted with it to make a weathered water stained look. I then just used various pieces from my stash after that like tissue tape, ribbon, twine, charms, etc. Then I sealed it all with Distress crackle paint in "Rock Candy," and used my Heat-It tool to dry.

Thank you for stopping by and reading this post, hope to be back soon with other little treasures and crafty bits! Until then, happy crafting!

Sunday, October 17, 2010

Pretty Lil' Pockets


Hi guys! So, I joined a swap for our group Shabby Chateau on Swap-bot to make these Lil' Pockets of Whimsey! How fun! These have so many wonderful uses and you can make them however you wish, this is just one example.

I started by flattening a 3.5 inch section of a paper towel roll. I lined the inside with felt and stapled one end together. I then used a beautiful brown Lokta paper for the outside. I then adhered a gorgeous vintage style parfume sticker I purchased from Regina's Studio on Etsy, a paradise for altered artists with many quality vintage items to be found! For the back I used a part of a lovely paper napkin she had sent along as a little extra with my purchase. After that I embellished with mini pearls, stained vintage book pages around the top and Rock Candy Stickles, Glimmer Mist and a tiny butterfly sticker. For the handle I used some amazing cabbage roses ribbon in Haunted Woods from another store on Etsy, MemrieMare a yummy little shop with some of the best ribbon! I then filled it with some ceramic buttons, a faerie charm and some of the ribbon for my partner!

So easy, so pretty, so many options! So get creative, these are great to give as gifts or hang on trees as ornament with a little surprises inside! Until next time, happy crafting!

Wednesday, October 13, 2010

Branching Out...


Here are two of my newest ATC's. I am really trying new things, making may own backgrounds, using inks and masks and many other new tools and techniques.

I am trying to find my own style and see what works for me and what does not. I want to thank bluemama from Flickr for sending me the little art squares along with her last ATC to me! They worked perfectly for these two ATC's I made. Thank you!

Until next time everyone, happy swapping!

Tuesday, October 5, 2010

A Wilde Fairytale


This little hand drawn ATC I drew for a WTA on Swap-bot. We were supposed to make something relating to the fairytale by Oscar Wilde "The Selfish Giant." This then is the ATC I came up with inspired by this sweet morality tale.

I used pencil, a fine point Sharpie pen in black and colored pencils, around the edges I tinged them with a couple of different Distress Inks and used a silver ink pen to highlight somewhat in the tree. Thanks for stopping by today!

Child's Play


I love images of vintage kids and these are so cute! The first one is one of my first attempts to make an inked background myself, by blending and using a clear mounted stamps. I wanted the focus to be this adorable girl who is so intent on her butterfly, so I kept this ATC fairly simple.

The second was for a new technique using tissue paper and to leave at least 75% of said tissue paper showing on the ATC. I love little challenges and these ATC's I so enjoyed making!

My New Collage ATC's...


So here are 3 new style ATC's for me. I am actually playing around with using pieces of scraps, tissue paper and whatever else I find to create the backgrounds you see here in the first 2 ATC's. I really like making my own backgrounds this way, they are unique and one-of-a-kind and I get to use my scraps of paper instead of jus throwing them out. Waste not want not!

The third ATC shown is just more of an ATC that was mainly collage only. I wanted it to have that feel and I think it came out different from many of my others and different right now is good as I am experimenting and finding my own style!

Don't ever be afraid to mess up some of my mistakes have turned out to the the best thing that has ever happened for my creative process. Embrace little scraps of paper and change and see what your art will do! Until next post, happy crafting!

Tuesday, September 28, 2010

Pieces Of My Life...


I made these two ATC's last night. I just got inspired to sit down and use the pieces of scrap paper that have been piling up in an endless sea on my craft table. My first real collages. They're so much fun, you start out with nothing in mind except maybe a color palette, then start gluing and see where your mind takes you. Each little piece of paper, scrap or mistake is now considered art. So, choosing from my stash, I glued away and these are the result. I then used Distress Crackle Paint in Rock Candy, a clear coat, to give it a cracked finish. I also used my Distress inks around the edges for a bit of added color. I used illustration board for the backing.

The first one is my favorite so far and also my first. It is titled "Pieces of my Life." The second one I made for a swap and it is titled "Words by Rumi." This one was inspired by the note card my partner sent along with a Poetry ATC swap. I liked how the ink looked on the brown paper and kept it, now the note card becomes something even more.

What a creative and inexpensive way to invent and recycle at the same time. So sit down get out your glue stick and scraps and play! Have fun, you never know where your mind's eye will take you. Happy crafting!

Sunday, September 26, 2010

I Love Paris!


Today was a Parisian dream! These next few crafts were inspired by my love for all things French!

The first one is av available for trade but only for another Paris themed ATC that I think is "to die for." I really love this one and it is the first one ATC I have made using Distress Ink in Vintage Photo blended for the background. After that, I sprayed it lightly with Glimmer Mist in Olive Vine. The stamp is from the French Market collection by Tim Holtz for Stampers Anonymous, stamped in Distress Ink in Black Soot. The border on the left and other like fragments are the Nostalgia themed tissue tape by Tim Holtz. Then, the word fragments I made by tearing vintage book pages and staining them with Walnut Ink in Terra Cotta and Eucalyptus. The embellishments are a French postage stamp from my collection that was given to me in swap. An "E" made of grunge board from Tim Holtz's line that I stained with Vintage Photo ink and then covered with Distress Stickles also in Vintage Photo and a bit of black lace held in place with a brad by Lost and Found. The stamped flourishes on the top and left are stamped in Cosmic Copper from the "Brilliance" set of Dew Drops ink pads. I hope this information will help you create your own Paris ATC's and give you lots of new ideas!

The second ATC is traded as I made it to angel a swap on Swap-bot, titled "Where I Want To Live." Of course where else would I want to live, but Paris. Again, I used the same type of "E" for the word Eiffel and inked it with the Vintage Photo but then I took a cotton swab and dipped it into my Glimmer Mist in Olive Vine and dabbed it onto the "E" for a strong wash of shimmer. The background is from land of Nod studio, check them out on Flickr, lots of free awesome stuff like this to use. Over the background I then used a fabulous red sticker, and purple postage stamp. the Eiffel tower image is from a collage by Norma Frances, also on Flickr. I then added tissue tape along the bottom, and the used a label from a French wine and a Fleur de Lis I cut using a punch from Martha Stewart's line. So much fun, and words change the lettering, just remember to always have fun if trying this!

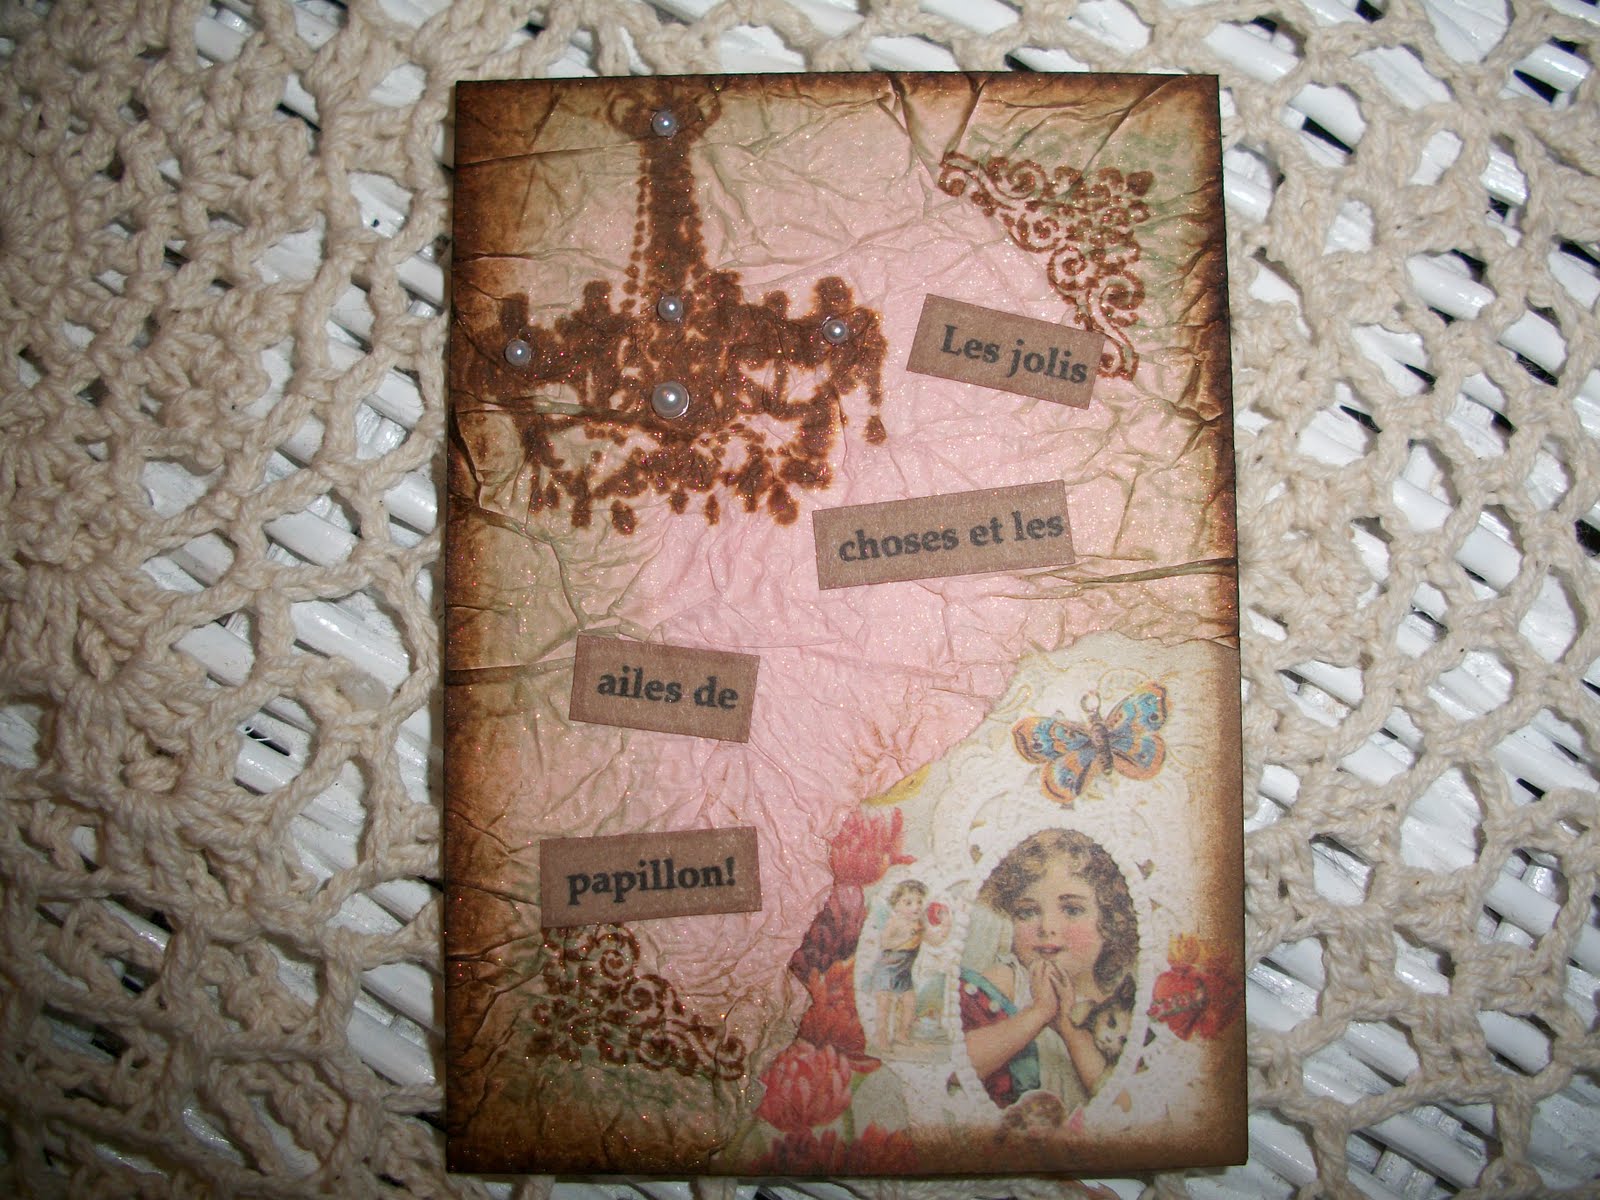
The last one is a postcard I made for an upcoming private swap. Using Distress Inks in Broken China, Vintage Photo and Black Soot I am blended them to make the background, then added the images and embellishments to complete. The crown on the left side I made using a "mini-mask" by Tim Holtz. Isn't it fun!? Bye for now...

Well, this is my latest post out of many, many more to follow soon! Happy crafting!

Friday, September 24, 2010

Poetry ATC Revisited...


I had a request to make this ATC again from a Flickr contact. I found a yummy Marie-Antoinette skinny by her, and she would trade the skinny for another skinny in return. So, I thought I could make the ATC she wanted from me into a skinny and make everyone happy, and that is exactly what happened! If you did not see my Moon Poetry ATC before in the previous post I will add it here for comparison. I wrote the brief verse on the card myself.

I tried to keep the composition as close as I could to the original without adding unwanted elements just to make it look balanced and then I found the lace and it all came together so nicely! I thought the ATC translated over well into a skinny and have now found another passion in skinny's as well! Happy swapping!

Vintage Variety


These are some ATC's I have made for Flickr and one I had a request to re-create, which is the first one shown. I love trading my ATC's on Flickr now, I had never traded that way before and it is quickly becoming addictive as well!

The first two ATC's are titled "Dream Vacation One" and "Dream Vacation Two," respectively. I love Paris, doesn't matter what, I love the museums, the language, the culture and food! So these were inspired by the lovely Eiffel tower image by Norma Frances, check out her photostream on Flickr she does amazing work and has a "free to use" digital collage set. They are stunning!

The third ATC I made from another Norma Frances background but layered heavily with all sorts of lush embellishments and lace. I loved the image and knew I had to do something gorgeous with it.

The fourth one titled "The Wonder Years" is simple, elegant and fun! This marks my first time using twine on an ATC, I loved the feel and texture it gave to the card.

The last one was sent as a thank you to a new friend on Flickr. I wanted a classic vintage ATC and had never used an image quite as dour as this one, no one ever looks happy in these pics, do they! But it was fun to make anyway! Well, I hope you like my latest ATC's! Feel free to peruse and hopefully take a little inspiration from them! Until next we meet, happy crafting!

"Opposites" Angel


Hello all! Welcome back to my blog where I am crafting once again! I have been very busy on the bot and now on Flickr as well. But today I have something I have never done before. I am sure others have tried this idea, but for me I came up with it to angel the "Opposites ATC" swap for AutumnRain.

I wanted something unique yet striking, so I thought about an angel and a demon, but I wanted the images to be pleasing as well. These are the ATC's I made for her. I divided the background papers, stamped and heat embossed the background and used a marker to help finish the edges. After adding the images and adding pieces of book pages I stained and highlighting the angel on each ATC with Glimmer Mist, they were ready. I really like how they look, simple yet there is something to them. Light and dark, angel and demon and even their composition is opposite the other. Until next time dear friends!

Wednesday, September 22, 2010

A Ghostly ATC...


This ATC was a sudden jolt of inspiration. I was cleaning my rubber stamps with my stamp conditioner and blotting them dry with a Viva paper towel. Well, it looked so pretty I thought, "I wish that were an ATC background," then I thought to myself, I will use it just for that, paper towel or no! So, I dried it out with my Ranger heating tool and glued it to an ATC back. I didn't want to use marker around the edges like I normally do so I took my Encore ink pad in metallic purple and pressed the edges of the card lightly on the ink pad. I then found the images and words I wanted and made them up staining the paper with my trusty Walnut Inks, as I also did with the torn book pages.

I just love the result! The French actually says "ghost script," because of the handwriting on the background that is fading. You have to be a bit careful in handling the ATC while working with it as any glue on your fingers will stick to the background. So cleanliness counts when working with this method.

Thanks guys! This was fun and I hope it gave you some ideas of your own! Happy crafting!

Sunday, September 19, 2010

About Anne...


Anne Boleyn, my favorite wife to Henry VIII and mother of Elizabeth. I am in a group on swap-bot it's The Tudor Exchange and we are currently having a wonderful ATC series of The Six Wives of Henry VIII, these therefore, are the ATC's I made of Anne, second wife to King Henry.

I worked almost the entire morning yesterday on these two ATC's and I loved the way they turned out. The first one I loved the image so much I knew I wanted it to pop and be rich and vibrant with colour. I stamped the paper I chose for the background and used vintage book pages I tore and then stained with Walnut Ink. I then used a stamped the make the border on the right hand side and the letter "A" as an embellishment made from grunge board stained with a Distress ink pad and sprayed with Glimmer Mist in gold. I then highlighted Anne's attire with a silver gel pen.

The second ATC was very different for me and I wanted to make another "interactive" ATC, as I am trying new things along that line. If you notice the "wings" are cut out and made from the high ruff collar that Anne was wearing in this portrait, the tiara on her head I made from the trim on the bodice of her gown. The wings move and fold in to meet ATC size.

I do hope you enjoy these ATC's, may they inspire you as well. Happy crafting everyone, good-night for now!

Thursday, September 16, 2010

Whowillloveme Harry Potter?


Can you believe I've never made a Harry Potter ATC before this tag? I am a fan it's true, and I have made Twilight ATC's, Buffy ATC's, even Serenity ATC's but NO Harry Potter! Shame on me, I hope this makes up for it and that this tag will be the start of a new Harry Potter crafting experience for me.

So, this is a tag on Swap-bot for 2 ATC's, a bookmark and a postcard. Well, as you can see I made 2 extra ATC's as I got inspired and was crafting like a mad-woman. I hope the recipient, whowillloveme is as excited to receive it as I am in sending.

I chose my fave character, Sirius Black and my most despised villain, Bellatrix Lestrange as choices for 2 of the ATC's and the bookmark. The other set of ATC's I chose my fave teachers, the ones who make me smile every time I see them! For the postcard I choose Fawkes, because, well...Fawkes is awesome and has saved the day more than once. I think most people forget the brave animal friends in the series, so here I am giving credit where it is due.

Overall, I am fairly proud of this little tag and I hope it brings a smile, that is after all why I swap. :-)

Wednesday, September 15, 2010

In Friendship & Thanks...


I bought some die-cuts yesterday, I don't normally work with them or like them but these were nice, they were a K & Co. brand which is a good one, so I thought I would try them. I found the center piece image and thought I would make a postcard for my friend Mona! Not only does she give the best swaps but she is an RAK queen and I thought it was my turn!

So here is the result of me trying a little something new, I really wanted it it pink and sweet! The back is simple as it is supposed to be a postcard, although this one is too fancy to ever be mailed naked. I do hope she likes it! Thank you all for stopping by today, I am now off to create a fun and awesome Harry Potter package for a tag I am in! Until later, happy crafting!

My First Skinny!


Here now is a picture of my first Skinny for a swap for our Vintage Swappers group on Swap-bot! Marie-Antoinette was our theme and this one is titled "Springtime with Marie."

I used Vintage sheet music and books pages, a lovely pressed flower, along with some stickers, brads and images to create the background. For the picture of Marie I used Glimmer Mist in Pearl and Smooch! metallic ink in Olive Twist to gild the edge. I then added a paper flower and a pearl earring to make her very fancy indeed! I raised up the portrait with foam mounting stickers as she is above all else in her world. I love Marie and had so much fun making this Skinny! I hope you enjoy it too!

Monday, September 13, 2010

Winner Keeps All!


Below are some of the offerings I made for the winner-take-all for my group Keepers of Avalon on Swap-bot! I made a postcard, two ATC's and a bookmark. I also included my "Magic Herb Guide" mini-zine!

The first ATC I made is titled "Nostalgia." I used tissue tape, a torn vintage book page, stamps, and stickers to create the background. I used an image I thought would be beautiful and show off the vintage theme of the ATC. Next I used a piece of filmstrip ribbon on one side and I added an antique style key embellishment and a jeweled brad in a light brown hue for the final touches.

The second ATC is titled "Lost and Found" and I really liked making this one, I used images, sticker, gears, handmade paper, and a brad to get the feel of items lost in time, this one is my favorite.

I really enjoyed putting this package together, I like trying new items and new looks. Thanks for stopping by and happy swapping!

Not Too Shabby!


I am in a scavenger hunt swap and some of the items can be handmade. I decided to make two of the five items and here they are, a set of two ATC's and a set of 4 tags in a French theme.

The two ATC's I made using stamps, brads, a gel pen, markers and Glimmer Mists. The tags I made by staining plain white tags with Walnut Inks, wiping the surface of them with a paper towel to smear the ink around for a more aged look and them decorating them as seen with stamps, stickers, images and old book pages. Then I tied a piece of cream colored string to each of them to complete the tags. I also went around the edges of the tags lightly with a colored sharpie to give them a more finished look.

I hope my partner enjoys them and will use them proudly. As for the rest of the swap I sent a pretty handkerchief, a set of two small doilies, two vintage French postcards, and a set of decorated papers and a Victorian style greeting card.

This swap is for the Shabby Chateau group and I must say this one is not too Shabby at all! Happy swapping everyone!